Understanding the Bloc Dashboard
Welcome to the Bloc Dashboard!
The sections in this article will introduce you to the terms and pages you'll see on your Dashboard.
Bloc is truly a powerful FinTech tool. From fully banking your business to accepting online and offline payments in minutes, we are making it easier for your business to grow and scale without constantly worrying about managing your financial operations.
Not sure what Bloc is? Read this collection of articles to learn more.
Introducing the Bloc Dashboard
In this article, we'll talk about each of the major pages on the Dashboard and what they are. You'll also learn to navigate the Dashboard to access banking and payments.
As soon as you log in, you'll be welcomed by the Get Started page. This page provides an overview of the dashboard.

Home
The home page is designed for you to manage your business finances with ease and efficiency. Here, you will see quick actions such as initiating a bank transfer, topping up your main account balance and accepting online payments with payment links.
These shortcuts help you complete common transactions without navigating through multiple screens. Here's a short description of the tabs on the Home page:
- Main Account Balance: This is the amount of money available in your main account. You'll also be able to see the balances of your sub-accounts by clicking and expanding this tab.
- Incoming settlement: You'll see all incoming payments ( also known as "settlements") from your payment links and POS Terminal transactions here. Every weekday, at 10 AM, we send the funds in your incoming settlement to your Main account balance.
- Cashback earned: This tab shows you how much commissions you have earned from paying your bills with the Bloc Dashboard, and you can click on it to view your commission history.

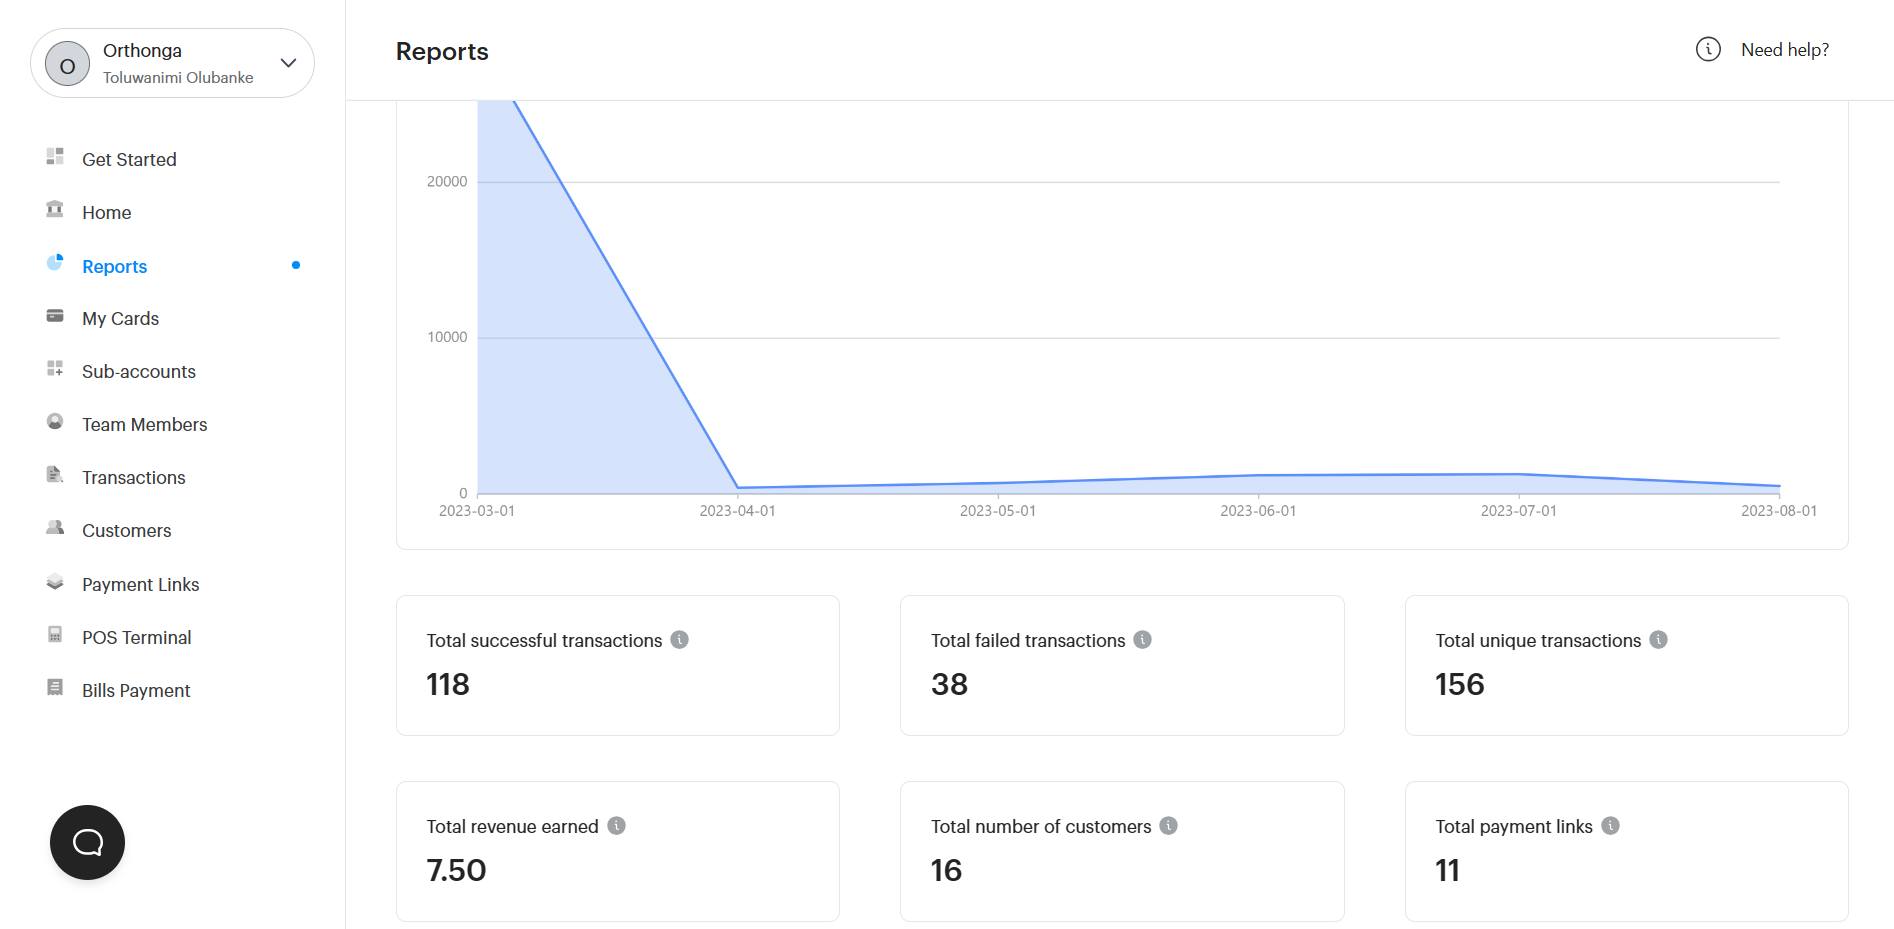
Reports
The Reports page gives a quick glimpse of your business performance. This way, you can stay on top of your financial standing at a glance. On this page, you can see:
- Your total inflow and outflow
- Total unique transactions
- Total revenue earned
- Total number of customers
- Total number of successful and failed transactions
- Total payment links created
My Cards
The Cards page lists all the cards (USD & NGN) you have created for your business/employees on the Bloc Dashboard. On the Cards dashboard, you can create multiple virtual cards and view the information of every cardholder in your organization.
You can see the brand of card issued to them, their card number, card balance, if the card is active or has been frozen, and the date it was created.
When you click on a cardholder, you can perform quick functions like:
- View card details
- Link to account
- Fund card
- Withdraw from card
- Reset card pin and freeze card
To learn more about what you can do with Cards, read these articles.

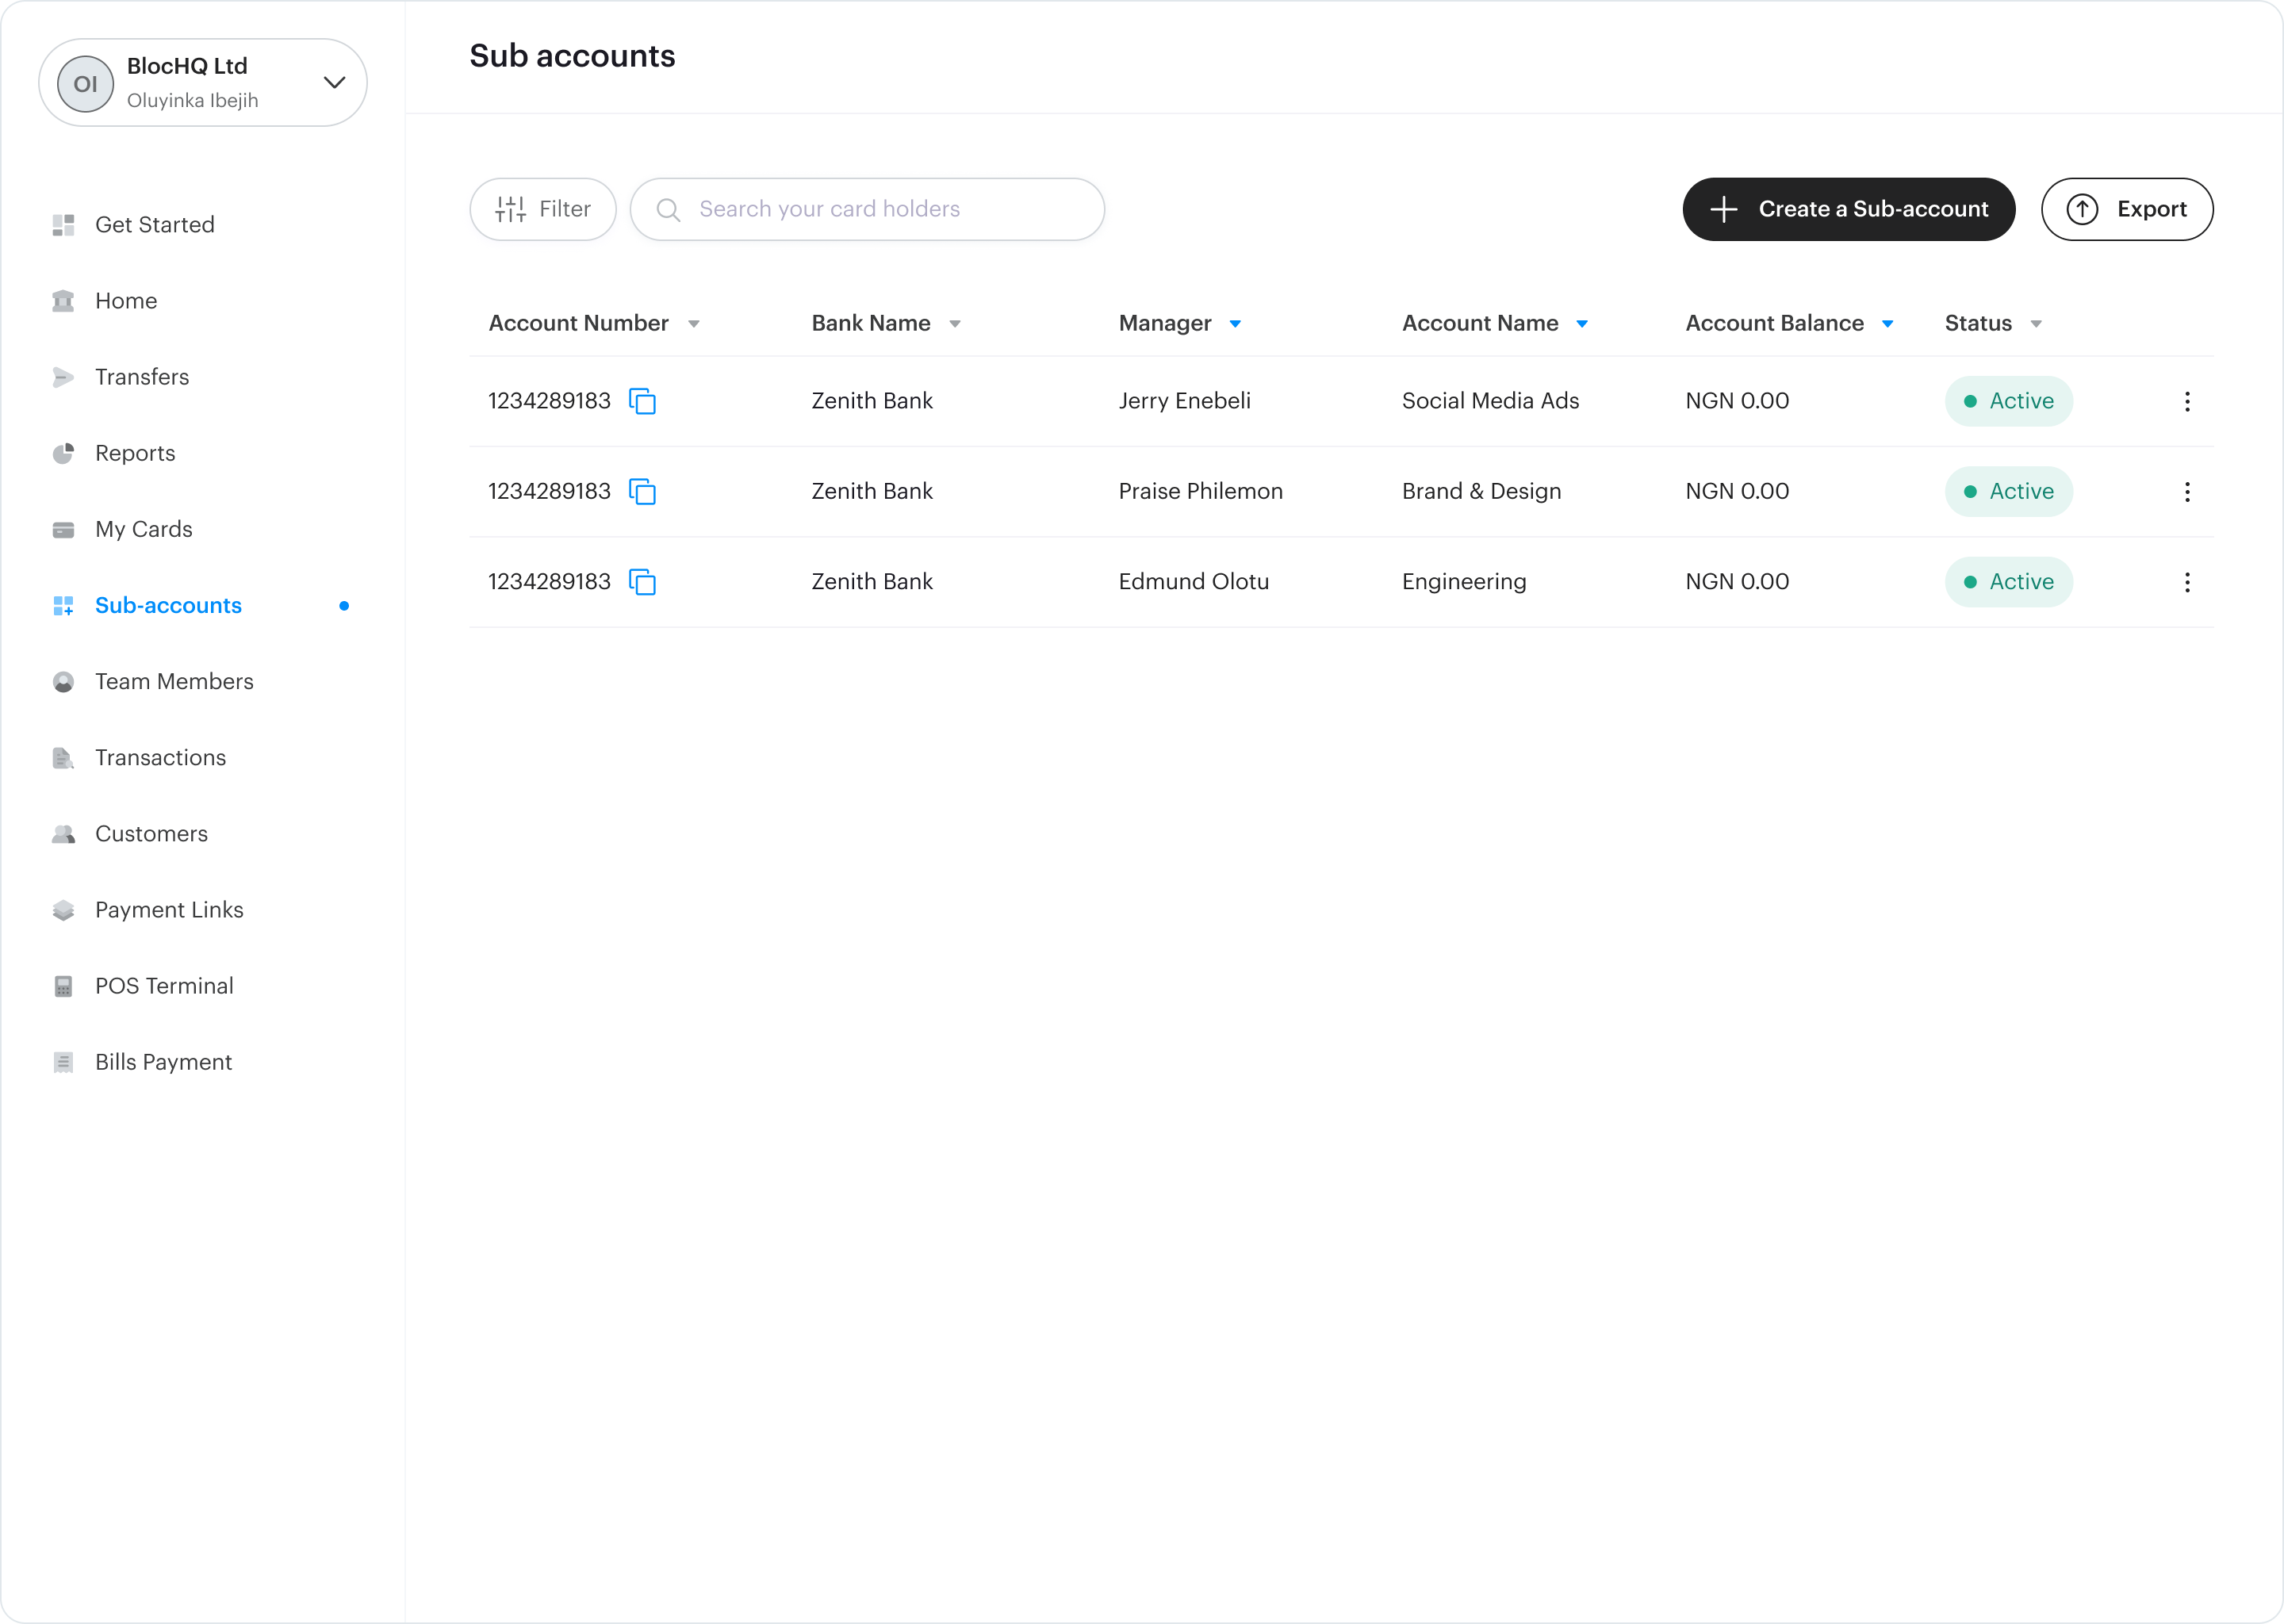
Sub-Accounts
On the sub-accounts tab, you can easily see all the multiple sub-accounts you created for your business on Bloc. It is where you create and manage all bank accounts you have created underneath your business. You can create an account, freeze/unfreeze, and close a subaccount.
You can also view the details of a sub-account and see an overview of the account, its successful/failed transactions, and its transaction history.
Team Members
This is where you manage roles and permissions for your teammates. You can invite a new teammate to the dashboard to manage financial operations for your business with their name and email address.
To learn more about adding a teammate, read this article: How to Invite a Teammate.

Transactions
The Transactions page provides you with a clear overview of where your money is coming from and where it's going.
Here, you can see all of the transactions that have happened in your Bloc business account. This includes transactions from payments received by your business, transfers made by your business, fees, commissions, etc.
You can:
- Search for a particular transaction
- Filter these transactions based on status, payment method, reversal, currency, date added, and source
- Export the table based on your filters.
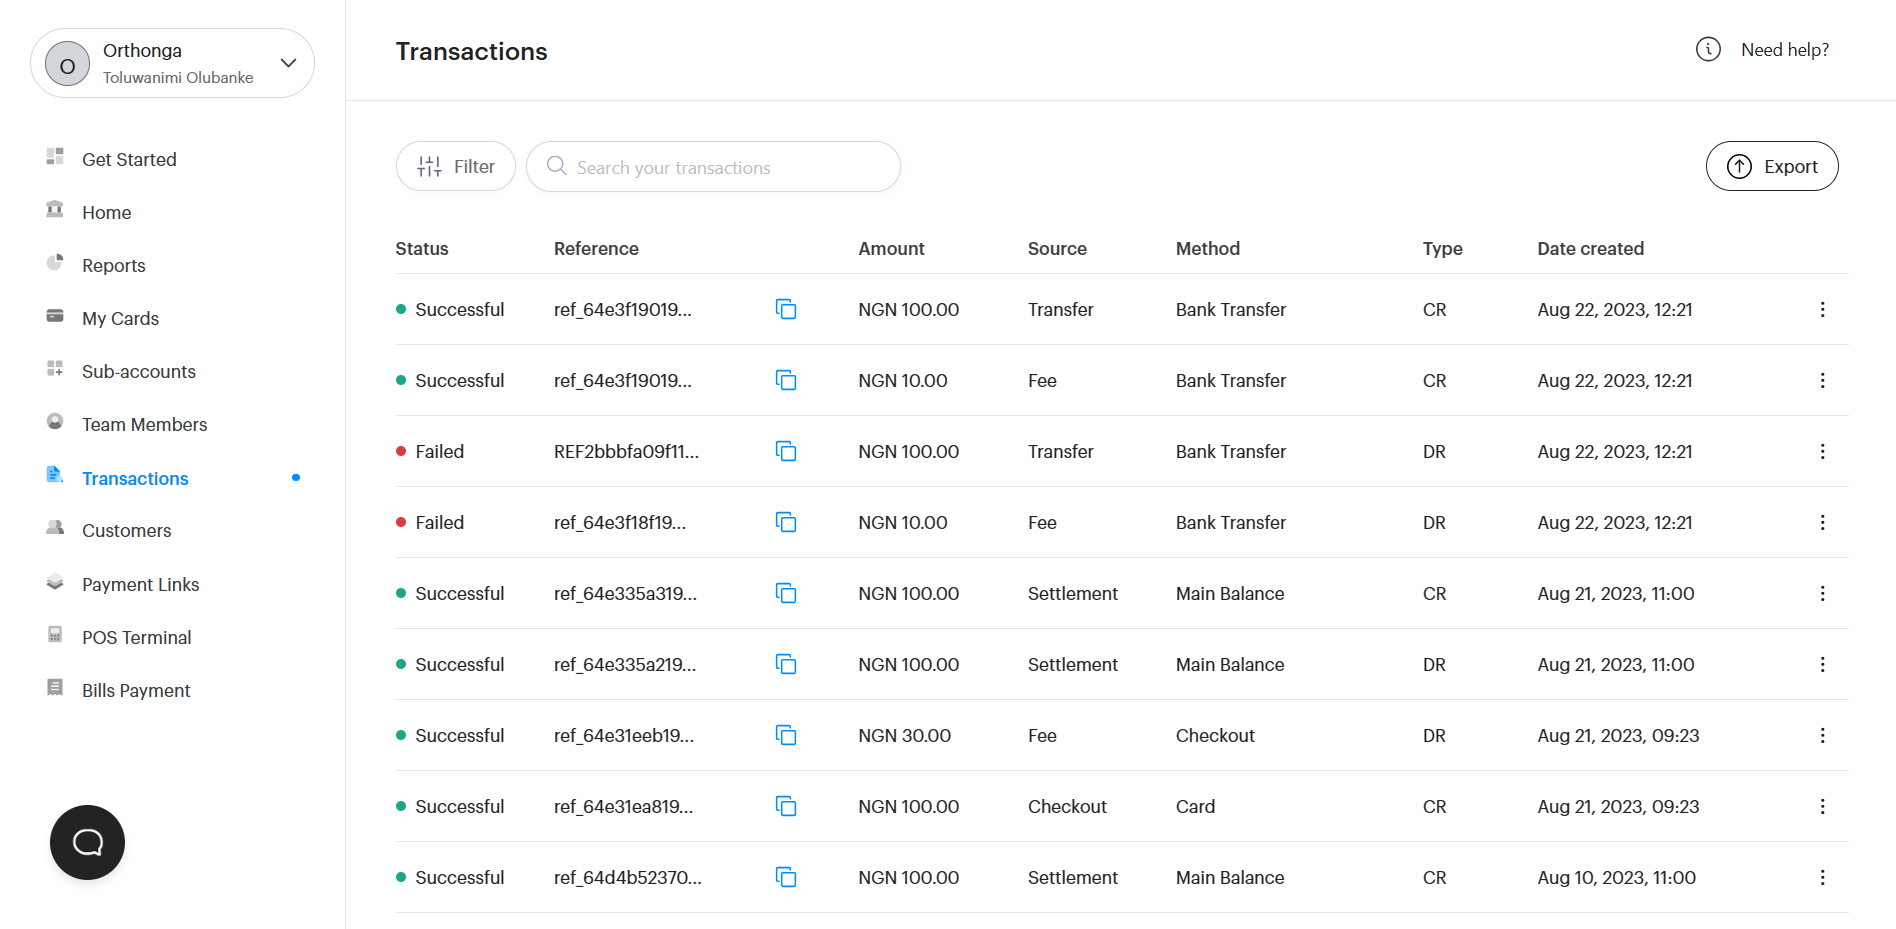
Here's a short description of the table columns:
- Status: This describes if the transaction is still in progress or not. You can further filter based on whether the transaction failed, was successful or is pending.
- Reference: This lets you query and find more details about a particular transaction. When you have issues, we ask for your reference. This reference allows us to be able to pinpoint the location of the transaction in our system. When we ask for your reference, simply click the copy icon next to the reference column of the transaction in query, paste it and send to us.
- Amount: This is the amount either sent or received.
- Source: This refers to where the transaction is coming from. It could be via a bank transfer, bill payment, checkout, commission or payment settlement etc.
- Method: This refers to how the transaction was made. It could be by Card, Bank Transfer, bill payment, checkout, etc.
- Type: This refers to whether the transaction was a deposit (credit - CR) or withdrawal (debit - DR).
- Date added: This refers to the date the transaction was created.
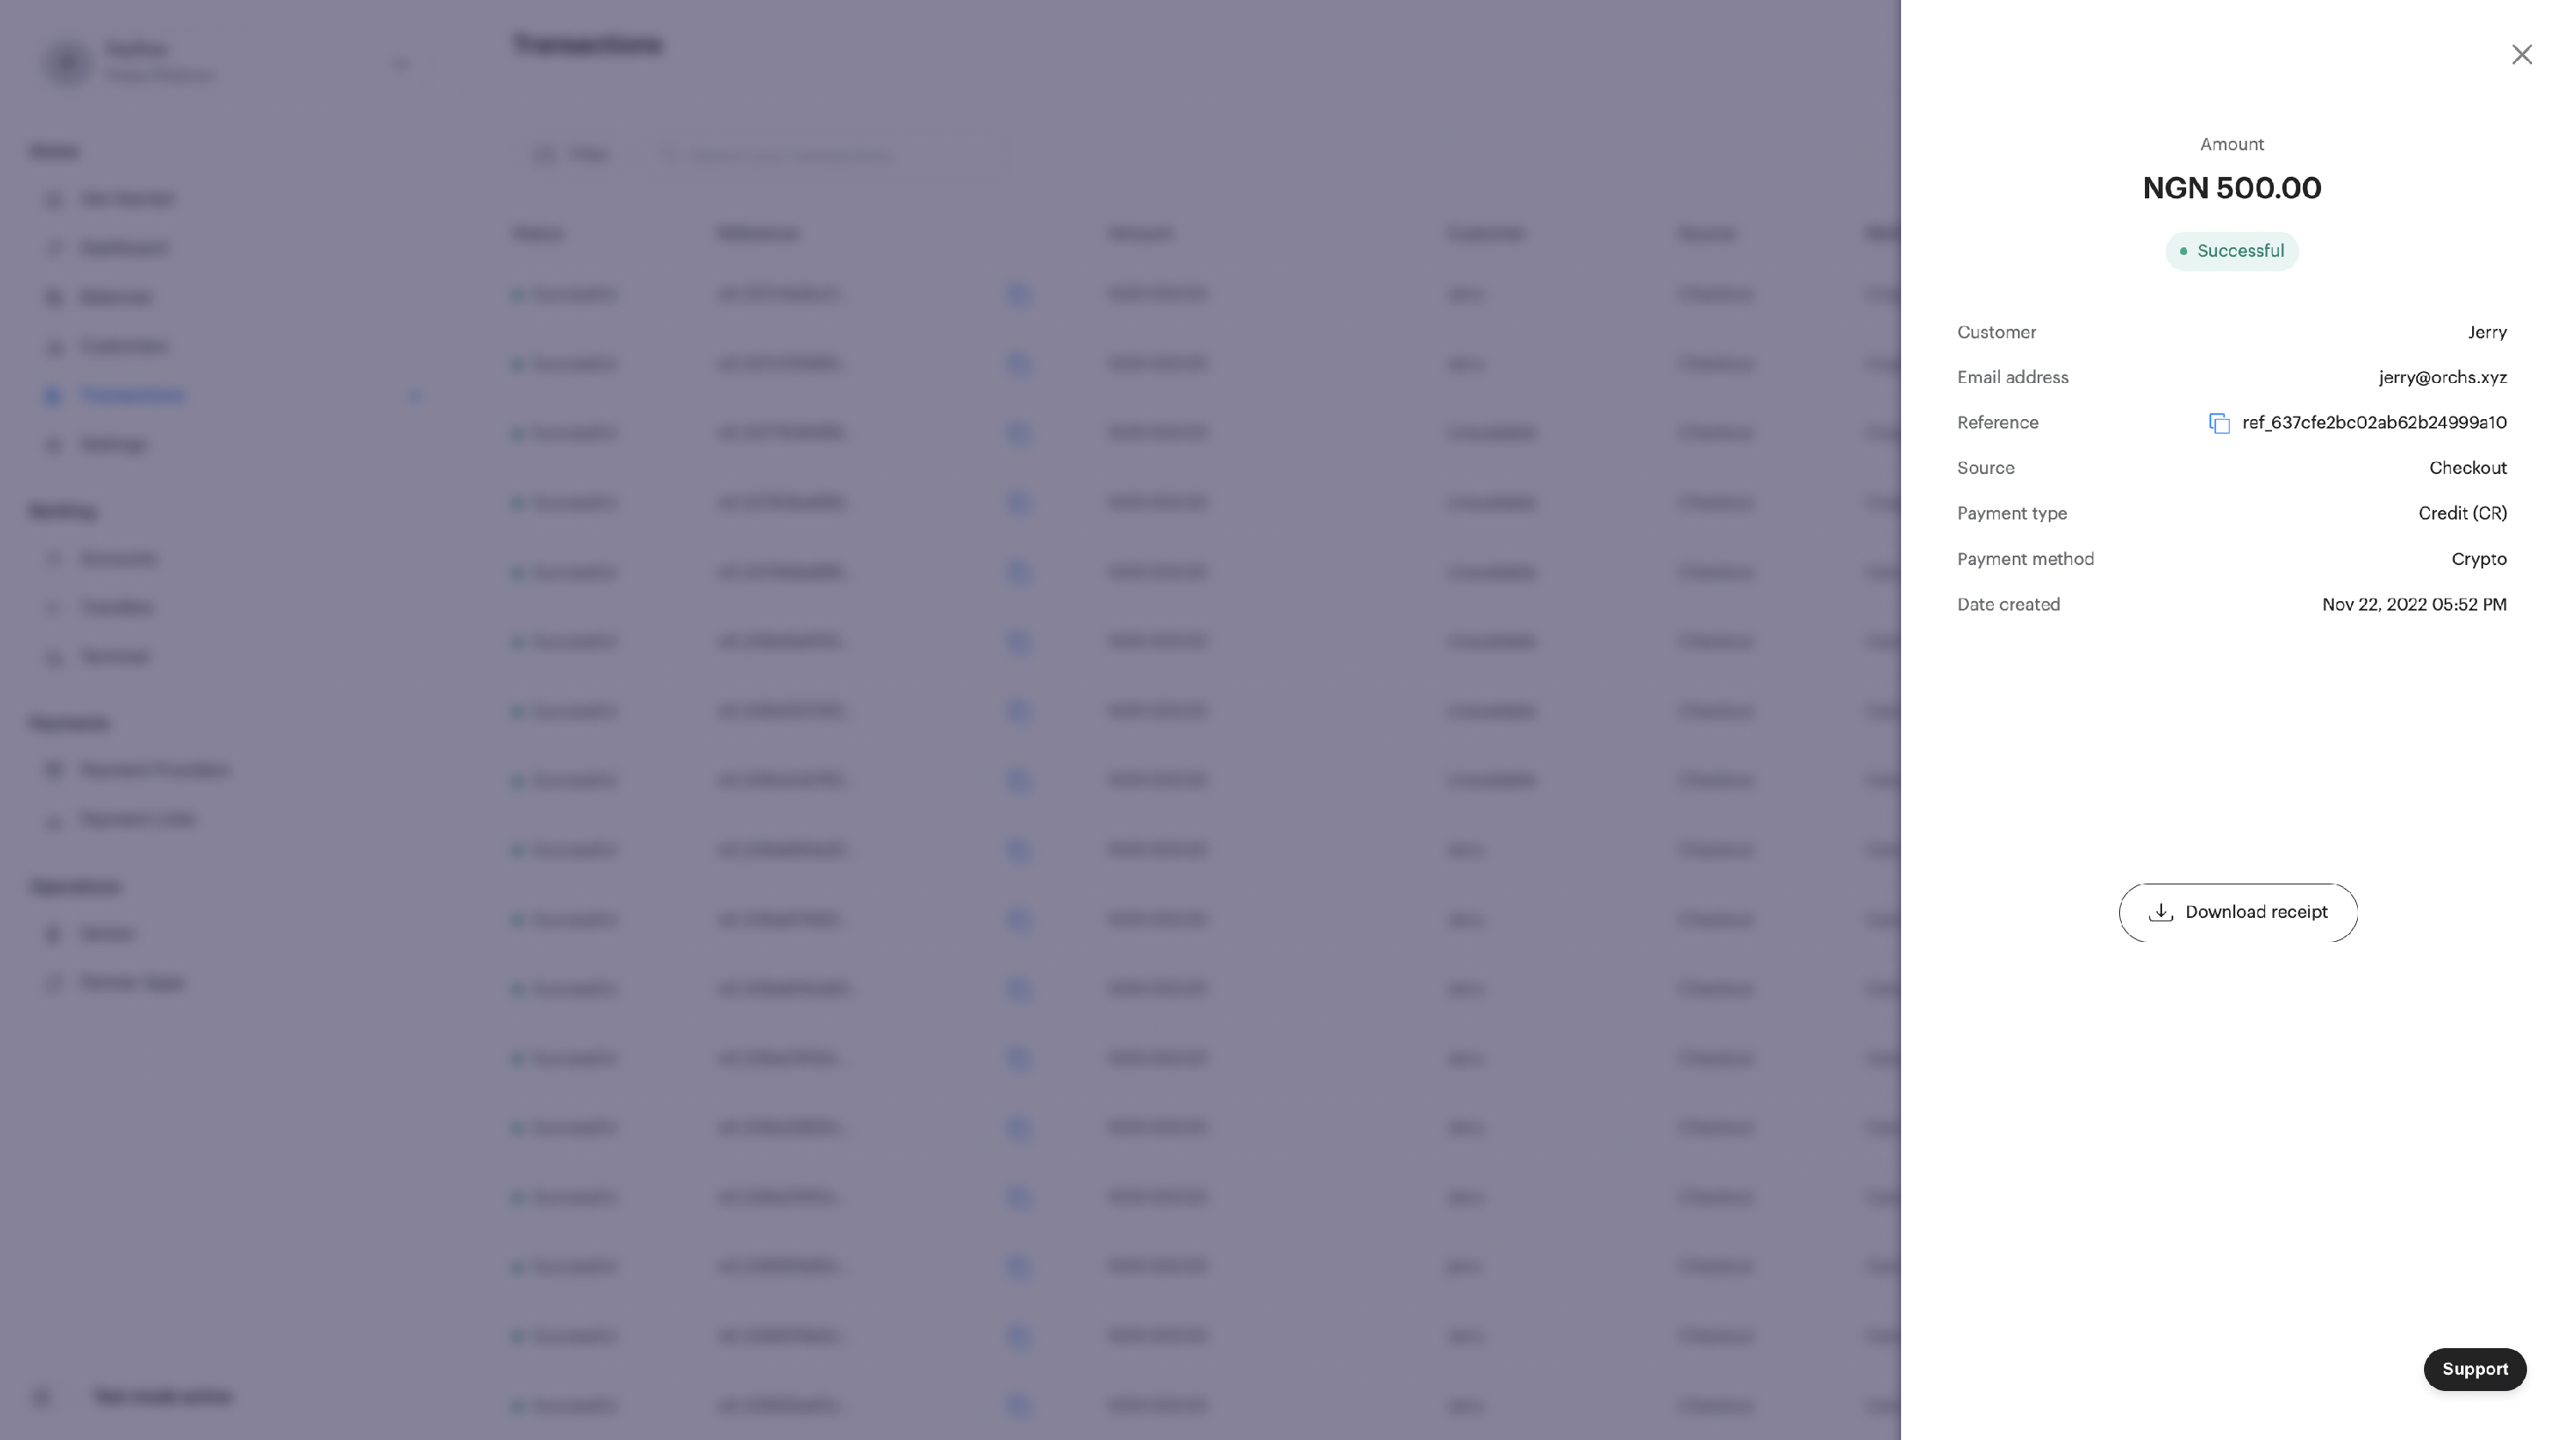
You can also view the details of a particular transaction and download a receipt of the transaction:
Customers
Everything on Bloc revolves around your customers. When you click on the Customers page, you can view a list of all the customers who have performed a transaction or interacted with you via Bloc. You can add a new customer with their name and email address or choose to archive a customer.

Important to Note:
Because of CBN regulation on people, you cannot delete a customer. Be careful not to create spam customer details on your dashboard.
Each customer is identified primarily with their email address across your dashboard.
You can click to view the customer's details. In there, you will see an overview of the customer's profile, their successful and failed transactions, their transaction history, a list of the bank accounts you created for them (if you created sub-accounts for your customers), and more.

Payment Links
The Payment Links is where you can quickly create a link to start receiving payments with Bloc. You can also track the performance of the link and see a history of all the transactions that have been carried out on the link.
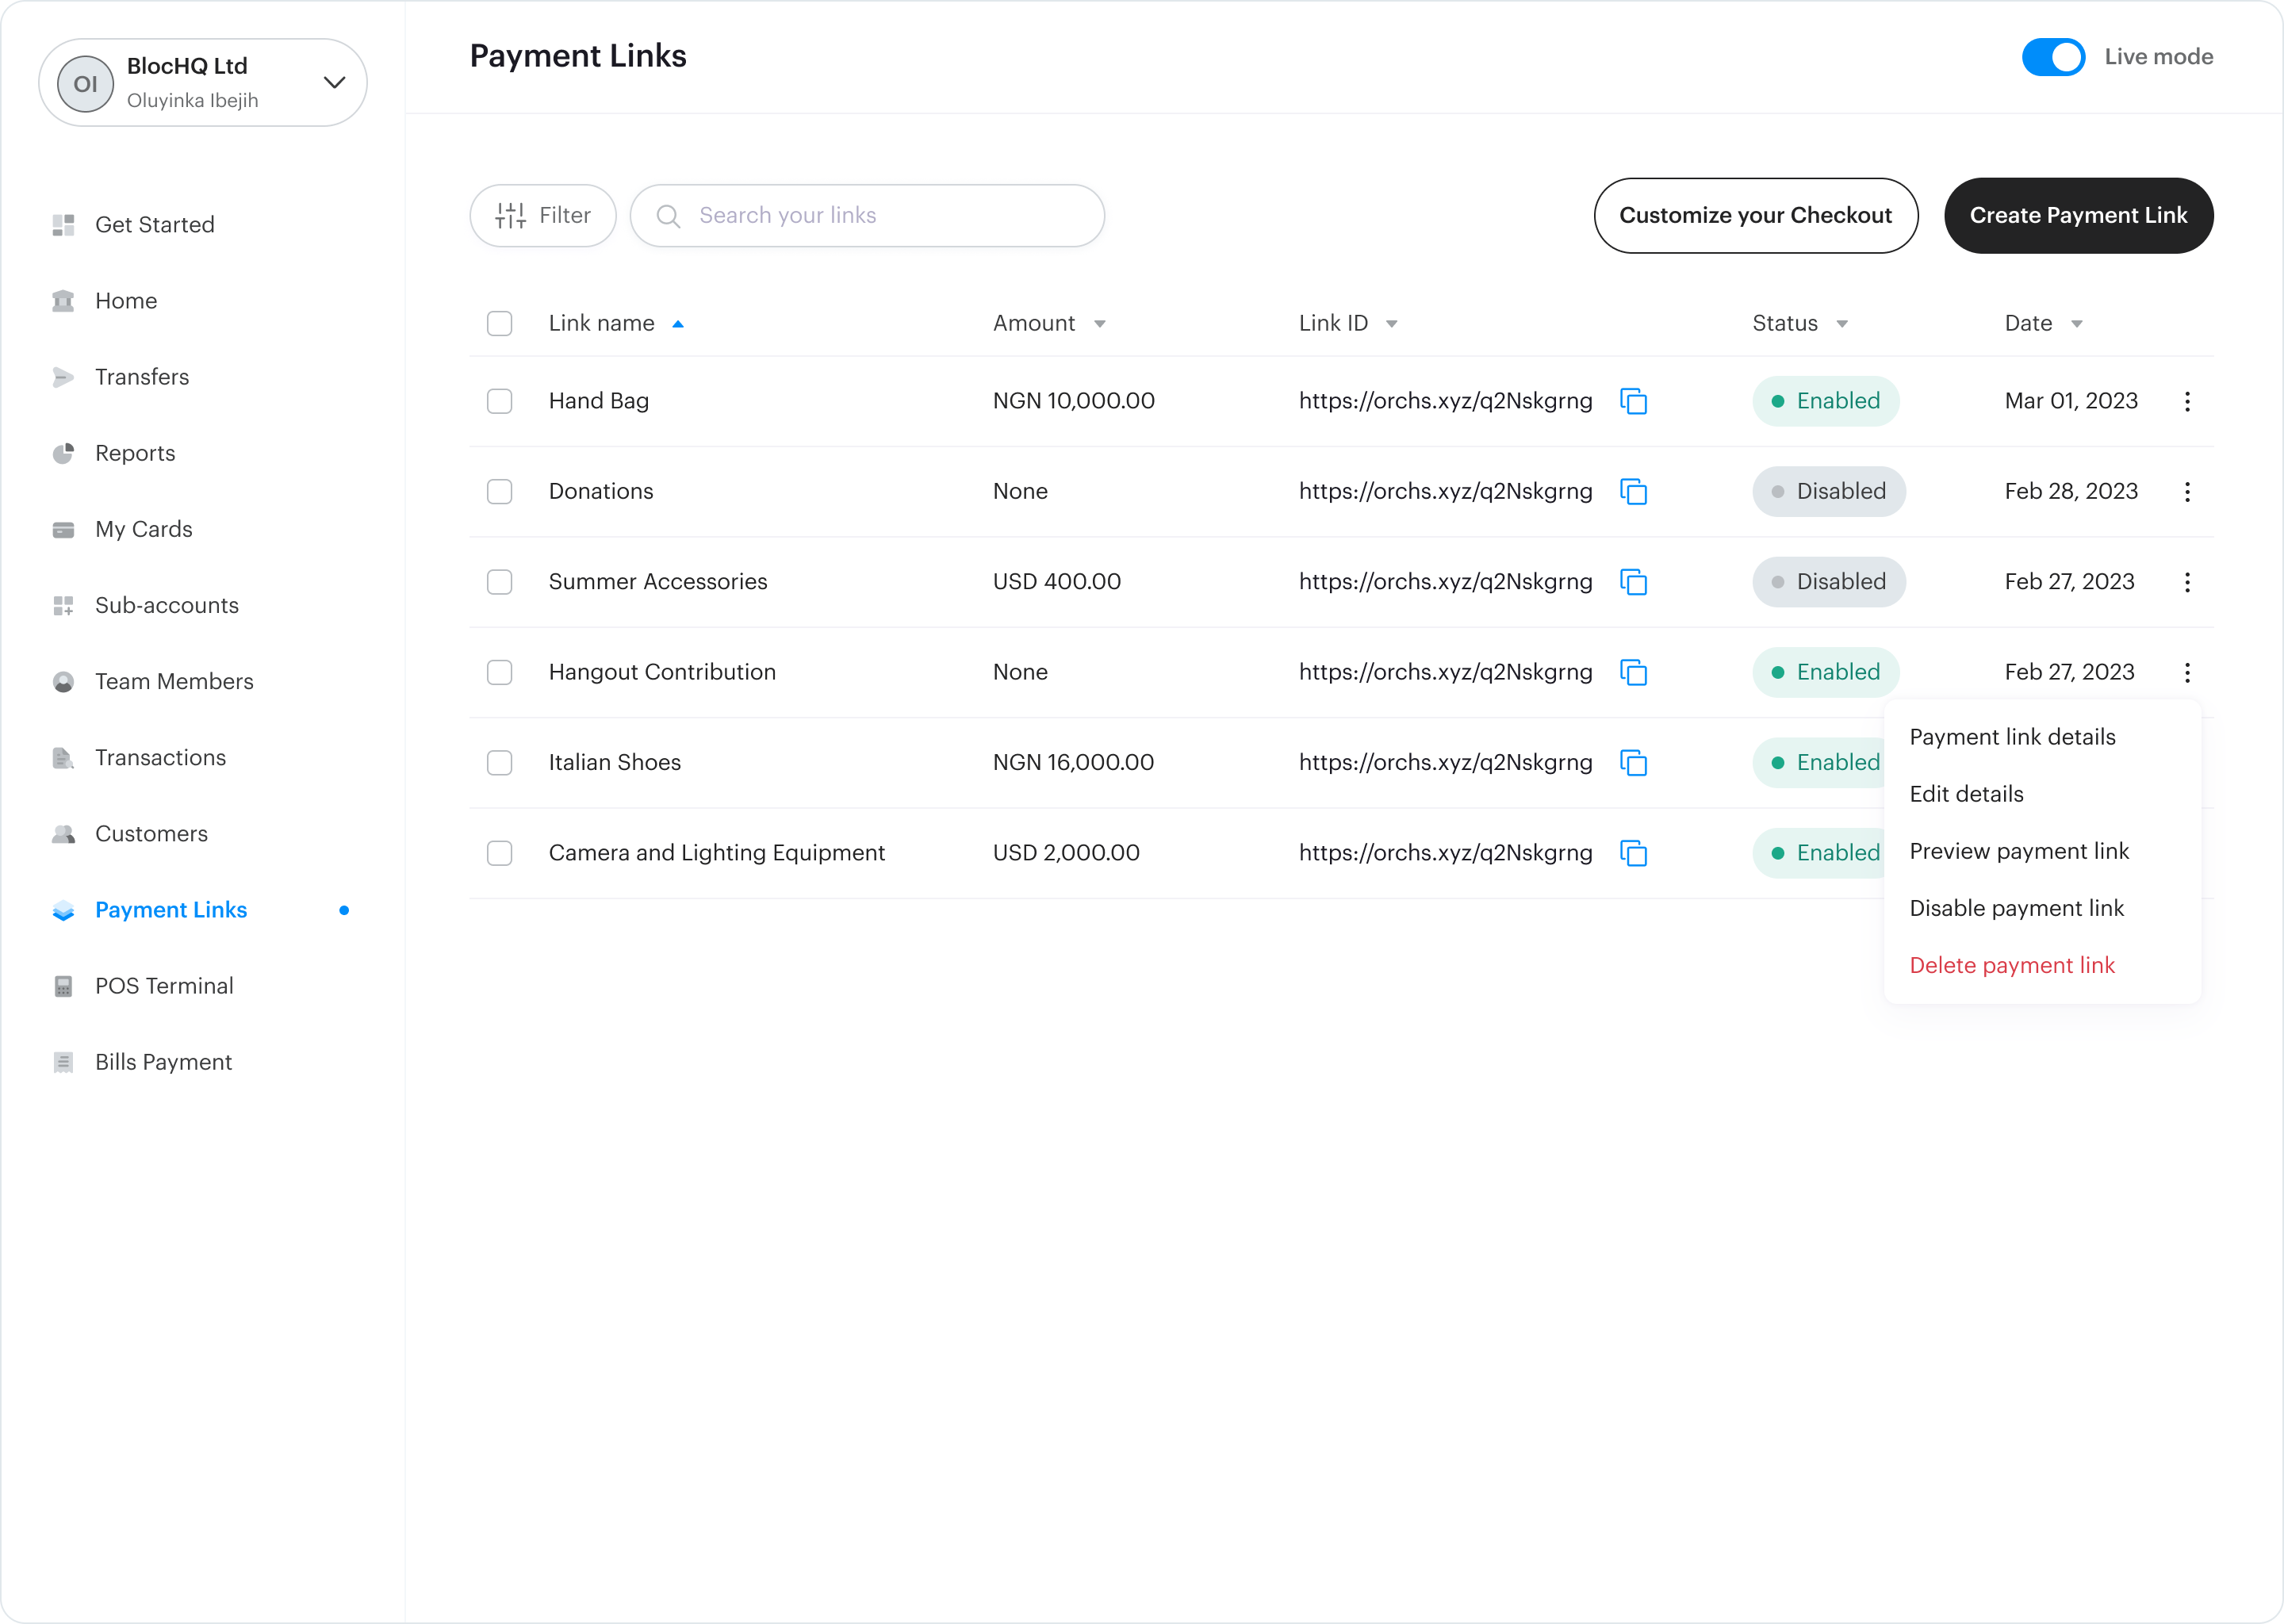
To learn more about this page, read this article: How to receive payments with payment links.
POS Terminals
The POS Terminals page allows businesses to be able to request, pay for, and assign POS devices to their agents/cashiers.
Read more about POS Terminals on Bloc here.
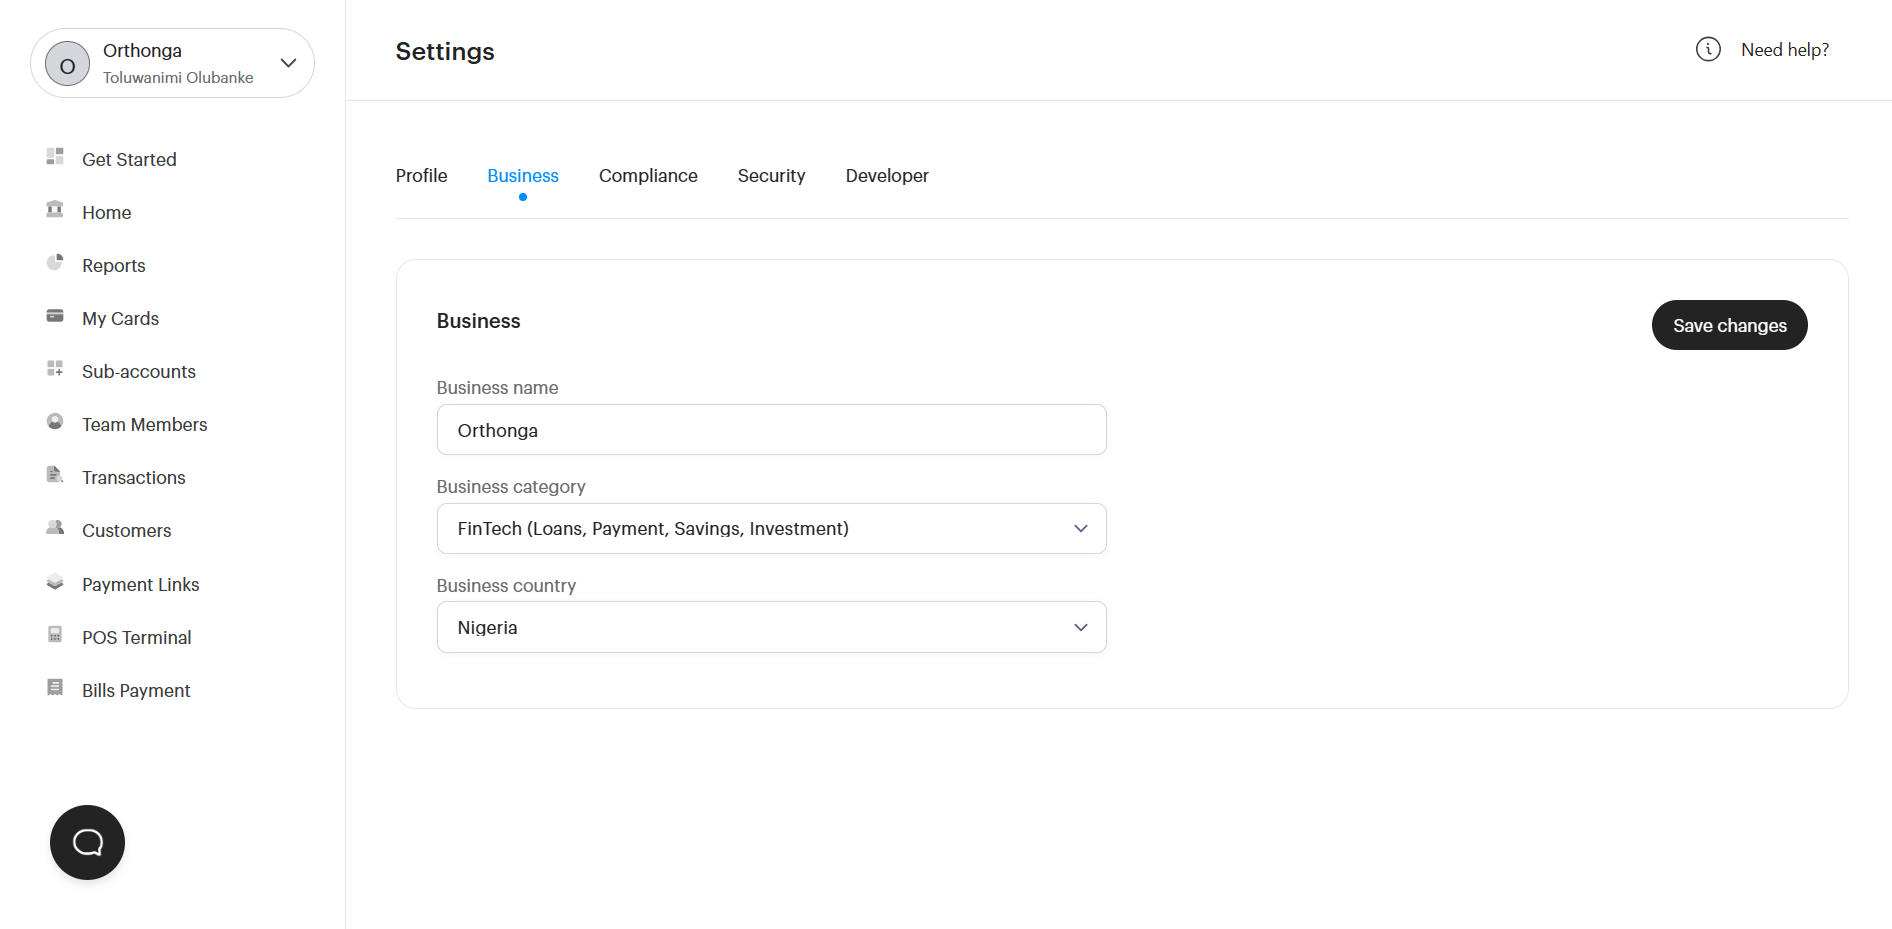
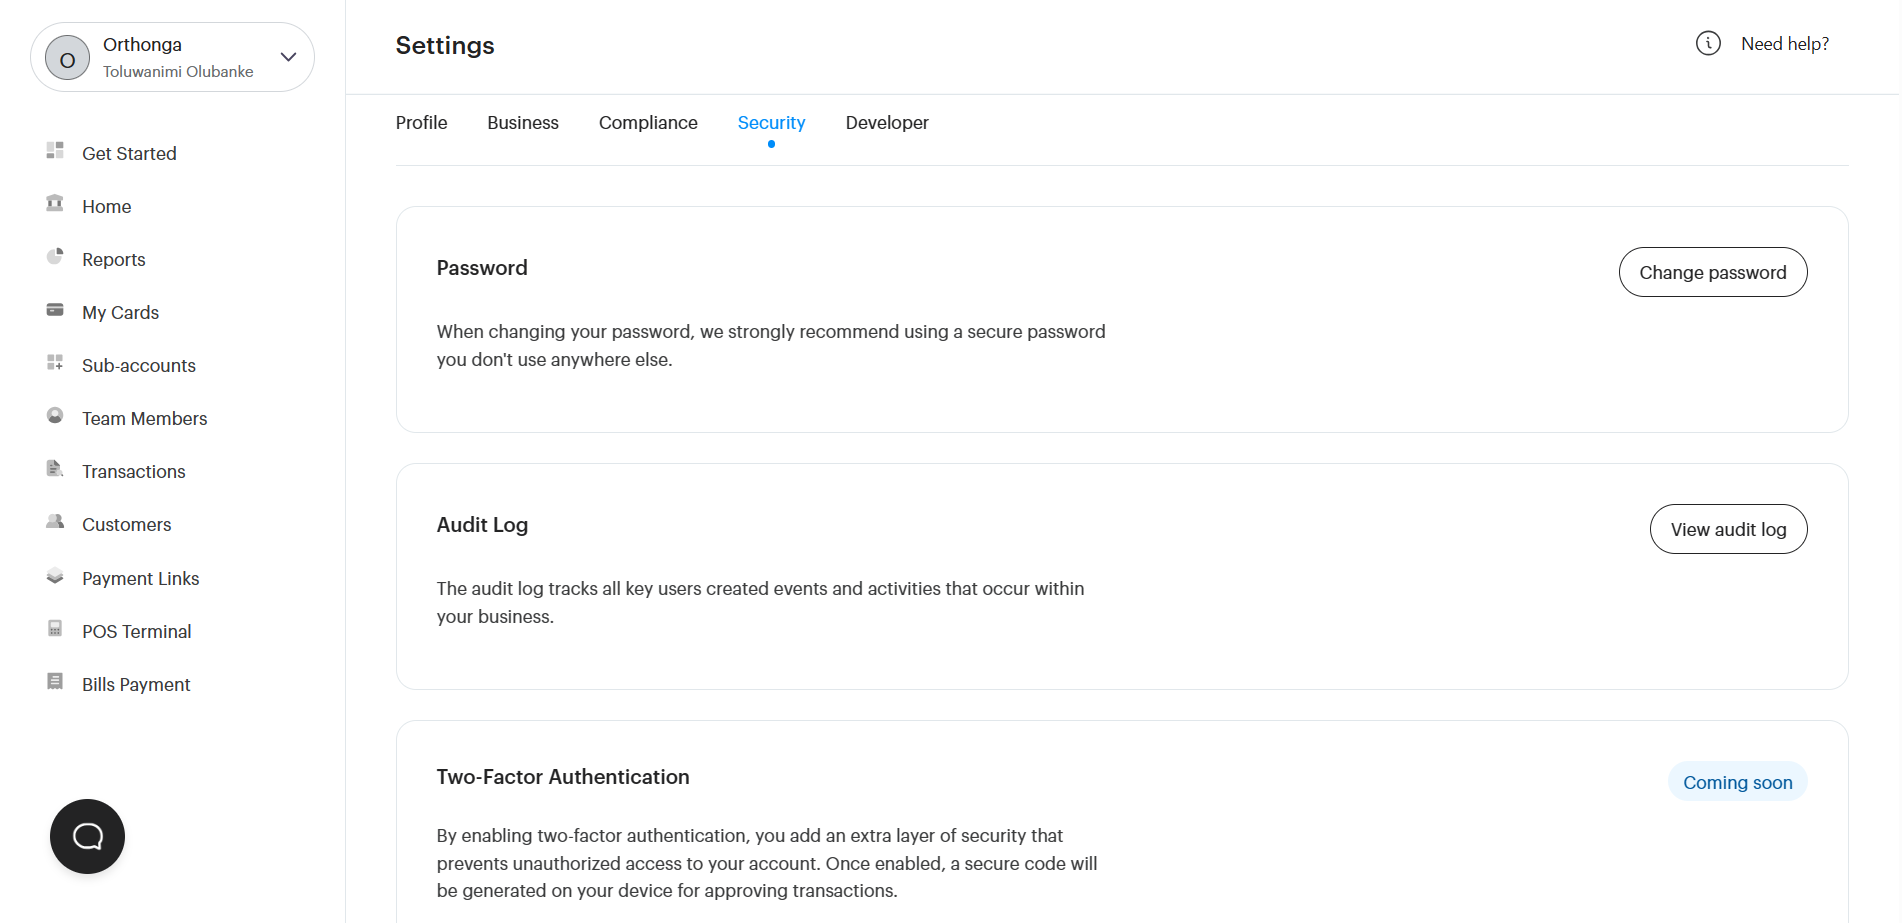
Settings
On your Settings page, you can edit your personal details and set up your business profile.
The Settings page is currently split into 7 sub-categories, namely:
- Profile
- Business
- Compliance
- Security
- Developer
Profile
This is where you can edit your personal profile and details. Input the edits, and click to Save changes.

Business
This is where you edit your basic business details like business name, category, country, and address.
Compliance
This is where you verify your business details. On this tab you can upgrade your business from Starter business to Registered business. To know more about how to switch from a Starter to Registered business account, read this article.

Security
Change your account's password, and add an extra layer of security with 2-Factor Authentication.
Developer
This is where you set up your API credentials and webhooks. This part of the dashboard is especially useful for technical businesses with developers and engineering teams.
Transfers
The Transfers page is where all payouts from the business are managed from. Read the article below to learn more about how it works: Sending Money with Bloc.
Workspaces
All of the above are grouped together into what we call "Workspaces". Each workspace is a business account on its own.
How it works:
- You can own a Bloc account, and still be invited to another Bloc account, as long as it is the same email that is used.
- You cannot sign up twice / create 2 Bloc accounts with the same email.
To switch between workspaces:
- Click on your name at the top left of your screen to see the list of workspaces your email is associated with.
- Select the workspace you want to gain access to, and it's done! Whatever you do on one workspace doesn't affect your other workspaces in any way.
Integration
Once you understand the basics of Bloc, you'll want to plan how you integrate it with your app/product. For small businesses and large organizations, everything you need is available on the dashboard.
For developers and engineering teams, please refer to the Bloc API Documentation for your integration guide. You can also learn more about getting prepared in this article: Getting Started with the Bloc API.